React loops
How to use loops in React
Tutorial describing how to easily use loops in react components.Disclaimer: In this lesson, we will quickly go through loops in React. I assume that you already know how to code loops in JS - if you don't then check this tutorial first.
For loop
Currently, we have our main App Component
          class App extends Component {
            state = {};
            render() {
              return (
                <React.Fragment>
                  <MDBContainer>
                    <MDBRow>
                      <MDBCol md="9">
                        <Event title="Meeting with John" time="10:00" />
                      </MDBCol>
                      <MDBCol md="3" />
                    </MDBRow>
                  </MDBContainer>
                </React.Fragment>
              );
            }
          }
and the child component:
        class Event extends Component {
          render() {
            return (
              <React.Fragment>
                <h3>
                  {this.props.time} - {this.props.title}
                </h3>
              </React.Fragment>
            );
          }
        }
A typical JS for loop looks like this one below:
      for (i = 0; i < 5; i++) {
        text += "The number is " + i + " ";
      }
Let's try to use it within our App component:
      <MDBCol md="9">
        for (i = 0; i < 5; i++) {
            text += "The number is " + i + " ";
        }
      </MDBCol>
As soon as we save the file, the compiler will raise an Unexpected token error:
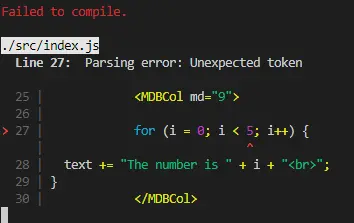
Apparently, React does not like for loops in its render()
method! How do we solve this?
What we need to do is to use a loop in a separate function outside render(),
but still inside the class. Then we can call the creating function inside render to get the result.
      myFunction() {
        var text = " ";
        var i;
        for (i = 0; i < 5; i++) {
          text += " The number is " + i;
        }
        return text;
      }
and call it within the render() method:
<MDBCol md="9"> {this.myFunction()} </MDBCol>
Preview:

Looping through components
Let's create an array containing some events in our App component:
    class App extends Component {
      constructor(props) {
        super(props);
        this.state = {
          events: [
            { time: "10:00", title: "Breakfast with Simon" },
            { time: "10:30", title: "Daily Standup Meeting (recurring)" },
            { time: "11:00", title: "Call with HRs" }
          ]
        };
      }
    }
Since we cannot use a for loop directly in our render() method,
let's modify our myLoopFunction() to work with our components:
    myLoopFunction() {
      var myArray = [];
      var i;
      for (i = 0; i < this.state.events.length; i++) {
        myArray[i] = (
          <Event
            time={this.state.events[i].time}
            title={this.state.events[i].title}
          />
        );
      }
      return myArray;
    }
As you might notice we made a few changes:
- we used an array instead of a string variable to collect loop output
- instead of hard-coded values, we are looping until we reach the length of
our events array (
events.length) - we refer to corresponding events in a table using an iterator (
i) (this.state.events[i])
Preview:
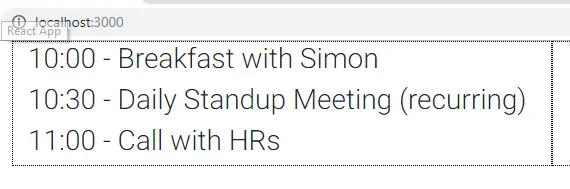
It works, however, there is a much better and easy way to loop within the render() method without using extra function.
Looping through components
Instead of typical loop we can use map() function:
    {this.state.events.map(event => (
      <Event time={event.time} title={event.title} />
    ))}
The result is the same and it's much shorter. Furthermore we can use
it directly inside the render() method.
We can now delete our myLoopFunction() since we don't need it anymore.
"key" attribute
The map() function makes it easier to iterate through arrays, however,
there is one important thing to remember while using map() in React.
When you open a console, you will see that React complains about missing key attribute:
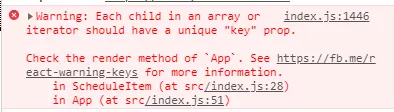
It is important for React to maintain the key for each element generated by the map() function.
This way React can handle the minimal DOM change. Let's add a few more items to our events array:
    events: [
      {
        id: 1,
        time: "10:00",
        title: "Breakfast with Simon",
        location: "Lounge Caffe",
        description: "Discuss Q3 targets"
      },
      {
        id: 2,
        time: "10:30",
        title: "Daily Standup Meeting (recurring)",
        location: "Warsaw Spire Office"
      },
      { id: 3, time: "11:00", title: "Call with HRs" },
      {
        id: 4,
        time: "11:00",
        title: "Lunch with Timothy",
        location: "Canteen",
        description:
          "Project evaluation ile declaring a variable and using an if statement is a fine way to conditionally render a component, sometimes you might want to use a"
      }
    ]
Now each element has its own id, which we will use as a key. We also extended some of our events with a location as well as a description.
Let's update our map correspondingly:
    {this.state.events.map(event => (
      <Event
        key={event.id}
        id={event.id}
        time={event.time}
        title={event.title}
        location={event.location}
        description={event.description}
      />
    ))}
The last step is to update our Event component to render our new metadata:
    <h3>
      {this.props.time} - {this.props.title}
    </h3>
    <h6>Location: {this.props.location}</h6>
    <p>Desc: {this.props.description}</p>
Preview:

Some of the values are empty and looks odd, that's why we will learn more about conditional rendering in the next lesson.