Free UI/UX design course
Learn how to create exceptional designs by reading my new tutorial.
Start learningDownload, installation and setup
In this lesson, you will learn how to download, install and set up Bootstrap in the easiest possible way, in just a blink of an eye.
We will be using the MDBootstrap version of Bootstrap. Why?
You can look at MDBootstrap as Bootstrap on steroids. And it's free.
MDBootstrap contains all the features of Bootstrap and additionaly provides you with:
- Hundreds of additional quality components, design blocks & templates
- Much better design than Bootstrap
- Much wider customization, theming and optimization options than Bootstrap
- Integration with Material Design (a design system created by Google)
- Integration with the most popular JavaScript libraries, such as React, Angular or Vue
- Integration with the most popular backend and CMS technologies such as WordPress, Node.js, PHP and many more
- Integration with TypeScript
- Dozens of high-quality, free tutorials (like the one you're reading right now)
- Playground, where you can freely experiment with the code directly in your browser
- Integration with MDB GO and MDB CLI, i.e. free hosting and an open-source deployment platform, thanks to which you can publish your website for free on the Internet in a few seconds
- Much, much more that you will learn in this course
Step 1 - download and setup
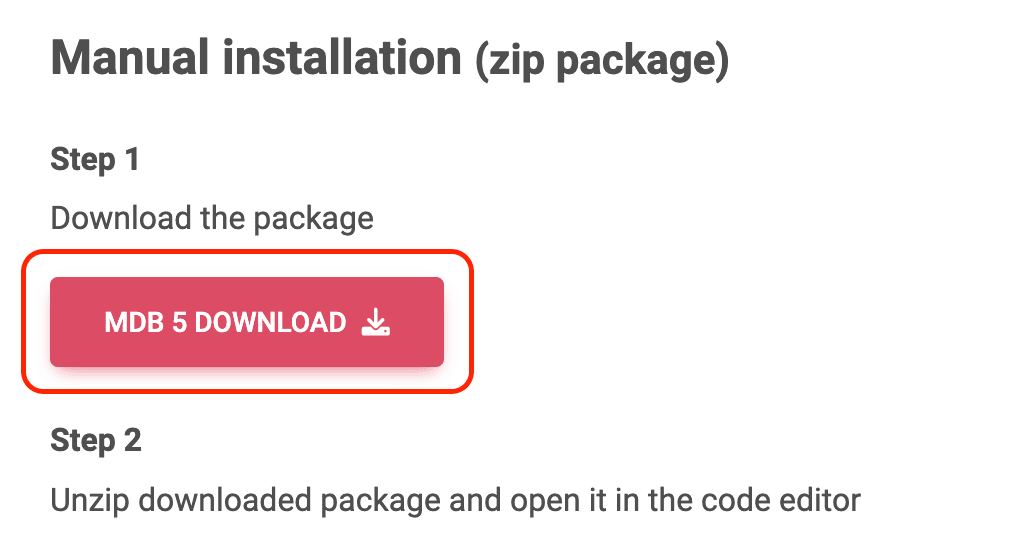
We will use the simplest method of installing, i.e. download the .zip package.
Go to the installation page and click the big, red button "MDB 5 download".
Then unzip the downloaded package and open it in your favorite code editor.
Note: The code editor is a matter of preference, but if someone asks me what I would recommend, my answer is Visual Studio Code.
It's free and you can download it here.
Step 2 - open index.html file
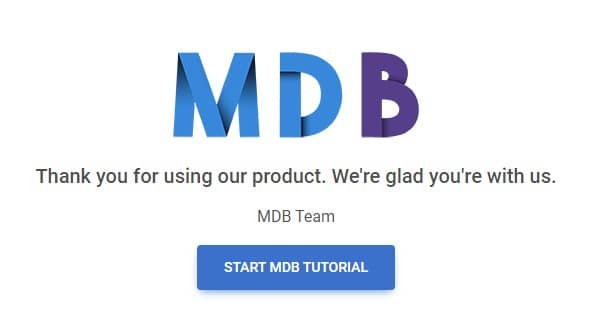
In the unpacked MDBootstrap directory, locate the index.html file, then drag and drop it into the browser window. You will see the MDBootstrap welcome message.
Then open index.html in the code editor. You will see a code like this:
    <!DOCTYPE html>
    <html lang="en">
      <head>
        <meta charset="UTF-8" />
        <meta name="viewport" content="width=device-width, initial-scale=1, shrink-to-fit=no" />
        <meta http-equiv="x-ua-compatible" content="ie=edge" />
        <title>Material Design for Bootstrap</title>
        <!-- MDB icon -->
        <link rel="icon" href="img/mdb-favicon.ico" type="image/x-icon" />
        <!-- Font Awesome -->
        <link
          rel="stylesheet"
          href="https://cdnjs.cloudflare.com/ajax/libs/font-awesome/6.0.0/css/all.min.css"
        />
        <!-- Google Fonts Roboto -->
        <link
          rel="stylesheet"
          href="https://fonts.googleapis.com/css2?family=Roboto:wght@300;400;500;700;900&display=swap"
        />
        <!-- MDB -->
        <link rel="stylesheet" href="css/mdb.min.css" />
      </head>
      <body>
        <!-- Start your project here-->
        <div class="container">
          <div class="d-flex justify-content-center align-items-center" style="height: 100vh">
            <div class="text-center">
              <img
                class="mb-4"
                src="https://mdbootstrap.com/img/logo/mdb-transparent-250px.png"
                style="width: 250px; height: 90px"
              />
              <h5 class="mb-3">Thank you for using our product. We're glad you're with us.</h5>
              <p class="mb-3">MDB Team</p>
              <a
                class="btn btn-primary btn-lg"
                data-mdb-ripple-init
                href="https://mdbootstrap.com/docs/standard/getting-started/"
                target="_blank"
                role="button"
                >Start MDB tutorial</a
              >
            </div>
          </div>
        </div>
        <!-- End your project here-->

        <!-- MDB -->
        <script type="text/javascript" src="js/mdb.umd.min.js"></script>
        <!-- Custom scripts -->
        <script type="text/javascript"></script>
      </body>
    </html>
That's quite a lot of code, and it can feel a bit overwhelming to start with. But don't worry, it's actually very simple and now we will explain it one by one.
The excerpted code snippet below contains the so-called metadata, placed in the head element.
These are not things you need to understand in depth. In short, they provide basic information for browsers and are usually set once and then can be forgotten without remorse.
If you want to know a bit more about them, there are explanations in the comments below.
Metadata
      <!DOCTYPE html>
      <html lang="en">

        <!-- Opening tag of <head> element. -->
        <head>

          <!-- This tells the browser to use the UTF-8 character encoding when translating machine code into human-readable text. -->
          <meta charset="UTF-8" />

          <!-- This tells the browser how should it render this HTML document. -->
          <meta name="viewport" content="width=device-width, initial-scale=1, shrink-to-fit=no" />

          <!-- This meta tag allows web authors to choose what version of Internet Explorer the page should be rendered as. -->
          <meta http-equiv="x-ua-compatible" content="ie=edge" />

          <!-- This is simply the title of this HTML document. You can enter whatever you want here. -->
          <title>Material Design for Bootstrap</title>

          <!-- This is the icon you see in the page tab. It currently shows the MDB logo, but you can replace it with whatever you want. -->
          <link rel="icon" href="img/mdb-favicon.ico" type="image/x-icon" />
Icons
This link imports icons, known as Font Awesome, into your project.
They are extremely useful and widely used in various components. On the icon documentation page, you can browse through all of them and then use them as you please.
        <!-- Font Awesome -->
        <link
        rel="stylesheet"
        href="https://cdnjs.cloudflare.com/ajax/libs/font-awesome/6.0.0/css/all.min.css"
        />
Roboto font
This link imports Roboto font. It is a typeface characteristic of Material Design, very aesthetic, legible and practical.
        <!-- Google Fonts Roboto -->
        <link
        rel="stylesheet"
        href="https://fonts.googleapis.com/css2?family=Roboto:wght@300;400;500;700;900&display=swap"
        />
MDB CSS file
This is the crucial link that imports MDBootstrap's CSS styles.
It includes Bootstrap, so you can take full advantage of all its features. Additionally, it provides you with features not available in Bootstrap itself, but available in MDBootstrap.
      <!-- MDB -->
      <link rel="stylesheet" href="css/mdb.min.css" />
MDB JavaScript file
This is a key JavaScript file that contains the code necessary for the MDB components to function properly.
Note the word umd in the link.
        <!-- MDB -->
        <script type="text/javascript" src="js/mdb.umd.min.js"></script>
Since version 7.0.0, there have been significant changes in our JavaScript. Now you can use ES or UMD formats for all components. These formats will differ in the way components are initialized and will be used in different cases.
What is the difference between MDB ES and UMD formats in MDB?
In short, the way to initialize components. In order to allow bundlers to
perform proper treeshaking, we have moved component initialization to the
initMDB method. MDB in UMD format
will work without adding more elements, but will lack treeshaking. MDB in ES format, on the other
hand, allows components to be used as separate modules, resulting in the much smaller build size.
If you are not using bundlers, you should use the UMD format.
In this part of the tutorial, we will use the simpler UMD method, thanks to which we will not have to initialize each component used (Remember when I asked in previous lessons to copy only the HTML code, without JavaScript? This JavaScript code is the initialization, necessary if we used the UMD method instead ES format).
In later parts of the tutorial, we will also learn how to use ES modules, thanks to which we will learn the advanced options available in this method. For now, however, we will focus on the simplest solutions to learn the basics thoroughly.
Note: As you can see, there is no separate file for Bootstrap included here. This is because all the Bootstrap code is contained together with the MDBootstrap code in a single mdb.min.css file (and on the bottom of the document you will find a link to mdb.umd.min.js file for JavaScript).
This approach provides better optimization and usability.
Step 3 - prepare index.html file for the new project
Let's remove unnecessary code so we have a place for our new project.
Below the opening <body> tag you will find the comment Start your project here and on line 46 you will find End your project here. In between is the code with the MDB welcome message:
        <!-- Start your project here-->
        <div class="container">
          <div class="d-flex justify-content-center align-items-center" style="height: 100vh">
            <div class="text-center">
              <img
                class="mb-4"
                src="https://mdbootstrap.com/img/logo/mdb-transparent-250px.png"
                style="width: 250px; height: 90px"
              />
              <h5 class="mb-3">Thank you for using our product. We're glad you're with us.</h5>
              <p class="mb-3">MDB Team</p>
              <a
                class="btn btn-primary btn-lg"
                href="https://mdbootstrap.com/learn/mdb-foundations/basics/introduction/"
                target="_blank"
                role="button"
                >Start MDB tutorial</a
              >
            </div>
          </div>
        </div>
        <!-- End your project here-->
Remove it, save the file, and refresh the browser. You should see a completely blank, white screen. Now we are ready to start a new project.

About author
Michal Szymanski
Co Founder at MDBootstrap / Listed in Forbes „30 under 30" / Open-source enthusiast / Dancer, nerd & book lover.
Author of hundreds of articles on programming, business, marketing and productivity. In the past, an educator working with troubled youth in orphanages and correctional facilities.