Free UI/UX design course
Learn how to create exceptional designs by reading my new tutorial.
Start learningGit basics
Now that we have created the repository, we need to learn how to manage it. That's why we need to know the basic Git commands.
But what exactly is Git?
Git is the most popular version control system and was created in 2005 by Linus Torvalds (yes, the same one who created Linux).
It is used for:
- Tracking code changes
- Tracking who made changes
- Coding collaboration
Let's use some Git commands in the repository we initialized in the previous lesson.
Step 1 - launch the terminal and navigate to your project
Launch the terminal and navigate to the project, where have you initialized the repository.
In my case, it's the path below, but keep in mind that yours may be different. It all depends where you put your project and what name you gave it.
cd C:\Users\MDB\Desktop\mdb-uikit-tutorial

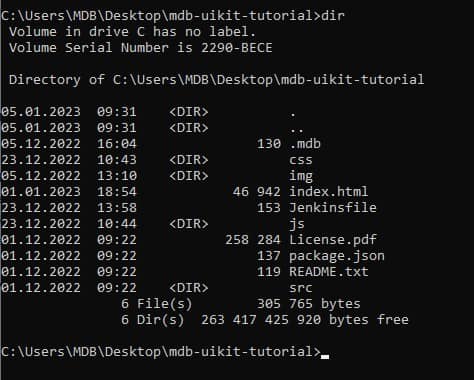
Now if you type the ls or dir command (on Windows 10) the terminal will give you a list of all files and folders. In the screenshot below you can see what it showed me:
Step 2 - add a new file
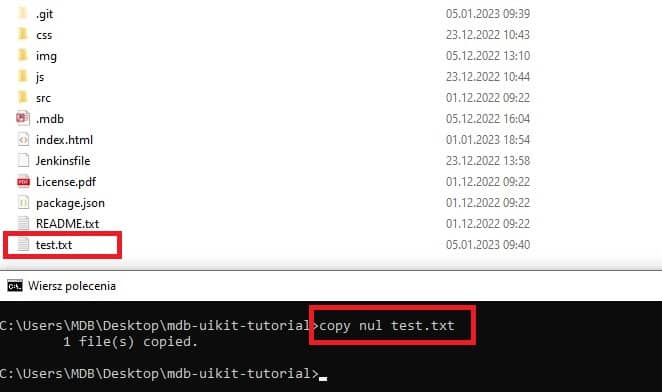
Now let's create a new text file called "test" to test adding and tracking changes to our repository.
In the terminal, type touch test.txt (or copy nul test.txt on Windows 10).
After entering the command, a new file should appear in your project folder.
Step 3 - check Git status
Now let's check if Git noted this change. Enter the following command in the terminal:
git status -s
You should see a new file in the terminal, followed by the characters ??

Two question marks (??) mean that Git is aware of this file but has not added it to our repository.
Files in your Git repository folder can be in one of 2 states:
- Tracked - files that Git knows about and are added to the repository
- Untracked - files that are in your working directory, but not added to the repository
When you first add files to the repository, they are untracked. To get Git to track them, you need to stage them, or add them to the staging environment.
At the moment test.txt is untracked. We'll change that in the next step.
Step 4 - stage the file
One of the core functions of Git is the concepts of the Staging Environment, and the Commit.
As you work in your project, you will add, delete and edit files. At some point, however, you'll decide that you've reached the point where you want to save your changes to the repository.
For this, you first need to add the files to the so-called Staging Environment. Staged files are files that are ready to be committed to the repository you are working on.
To add our test.txt file to the Staging Environment, we need to use the git add command and the file name:
git add test.txt
Adding multiple files at once to the Staging Environment:
If you want to add more than one file at a time to the Staging Environment, use the git add . command (git add with a single dot).
After typing the above command, run the git status -s command again. You will see that the test.txt file now has an A, which means that the file has been added to the Staging Environment.

Apart from ?? and A you can also see the following file statuses:
- ?? - Untracked files
- A - Files added to stage
- M - Modified files
- D - Deleted files
Step 5 - commit the file
Now we are ready move from stage to commit for our repository.
Commits allow you to monitor changes and progress in our project. Commit is actually a savepoint that we can come back to at any time, for example to fix some bug or simply restore an older version of our project.
A very important element of each commit is a message that clearly describes what the commit is about. Thanks to this, other people working on a given repository (and yourself, because memory is very unreliable) will be able to easily understand in the future what exactly changes were made by a given commit.
To commit, we use the git commit command, then add the -m flag and add our message.
git commit -m "Adding test file to test git basics functionalities"

And now when you use the git status command, you should see the following message:
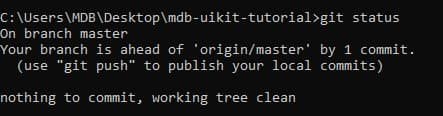
This means that everything is as it should be and our changes have been successfully committed. Hooray! 🎉
Step 6 - push the commit to the repo
We have committed our changes, but if you look at your repository, you will see that they are not visible there yet.
When I go to my repository at https://git.mdbgo.com/ascensus/mdb-uikit-tutorial I don't see the test.txt file yet.
That's because there's one more step ahead - we need to push the commit to the remote repository.
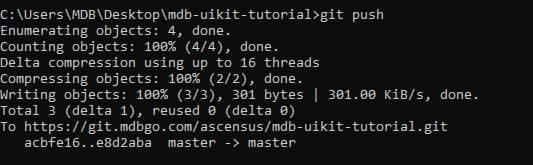
To push the commit to remote repository use the following command:
git push
If all goes well, you'll see a message like this in the terminal:
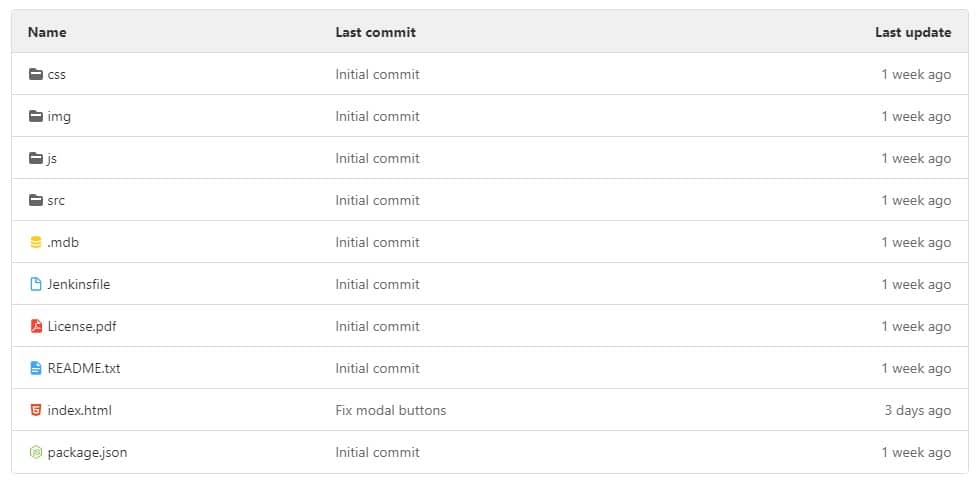
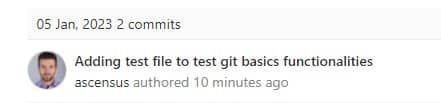
And now when you go to your remote repository under the "Commits" tab you will see your commit.
https://git.mdbgo.com/ascensus/mdb-uikit-tutorial/-/commits/master
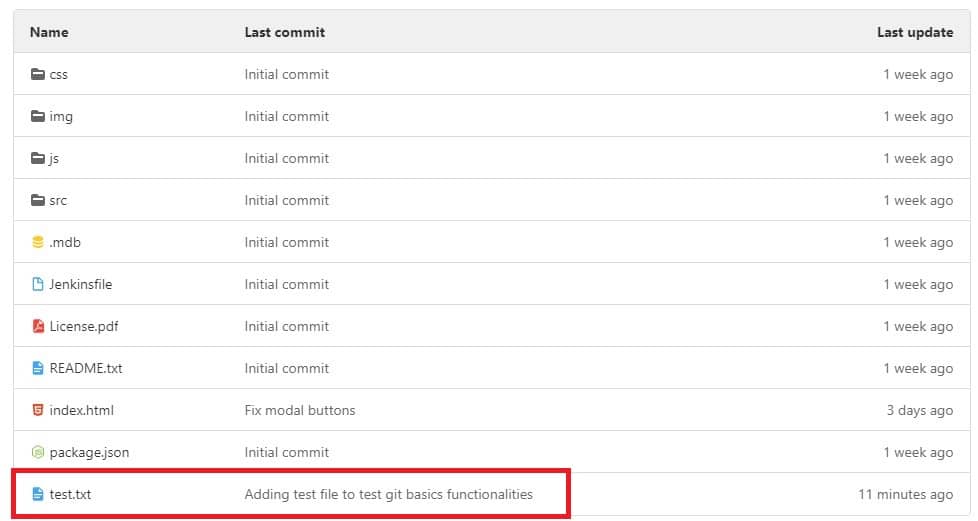
And finally, in the list of files, we will see our test.txt file.
https://git.mdbgo.com/ascensus/mdb-uikit-tutorial
Congratulations! You have committed your first changes and they are now available to other developers.
How do I download changes from other people working on the repository?
When working as a team, it's as important as adding your own changes to the repository to downloading others' changes.
To download the changes made by others, we must enter the following command in the terminal:
git pull
If we type the git pull command in the terminal, we will see the following message:

This means there are no changes to download. And no wonder, because for now we are the only person working on this repository. However, in a future lesson, when we learn how to collaborate with other developers, the git pull command will become very important to us.
Note: It's a good habit to use git pull command every time you start working on a
repository, before writing any lines of code, to see if there are any changes to download.
This will make our life easier and minimize the risk of conflicts when, for example, it turns out that you and another developer worked on the same files or changes.
Conflicts in the repository are an integral part of the programmer's work, in future lessons we will learn how to deal with them.

About author
Michal Szymanski
Co Founder at MDBootstrap / Listed in Forbes „30 under 30" / Open-source enthusiast / Dancer, nerd & book lover.
Author of hundreds of articles on programming, business, marketing and productivity. In the past, an educator working with troubled youth in orphanages and correctional facilities.